Sickle Cut (Sichelschnitt)
Case Yellow was the German offensive in May of 1940 that shocked not only the allies but the bulk of German high command. In less than a month's time it made quick work of Belgium and Holland, shattered the armies of France, and pushed the British Expeditionary Force (BEF) into the sea at Dunkirk. Additionally, Case Yellow achieved the largest pocket ever to be created in the war, with the largest number of captured soldiers as well. In hindsight, it may seem that all went according to plan but Manstein's daring strike through the Ardennes was a gamble that could have easily gone awry.
What to read:

What to play:


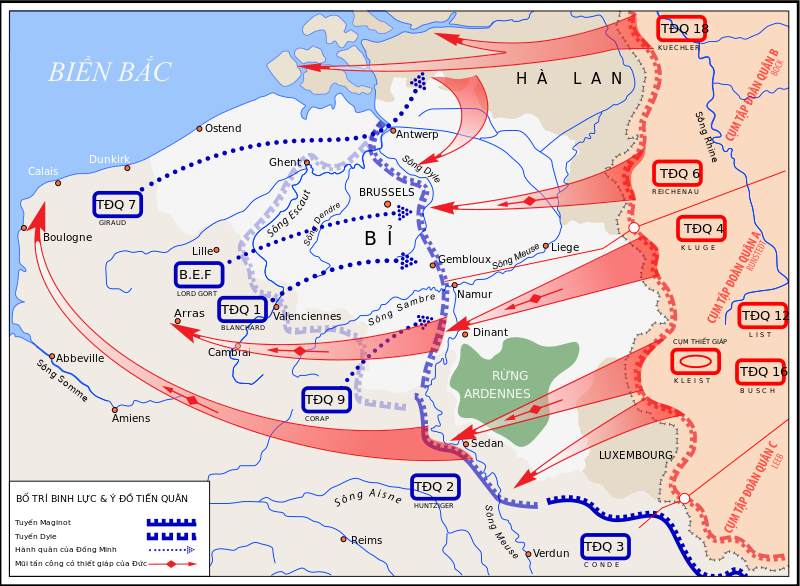
A range of historical problems confront the player directing the Allies in this game. His French, Belgian, Dutch, and BEF combat units have not yet mastered the faster pace of action in WWII, and therefore are slow and don't fight at full Action Rating when in Move Mode. The Allies are also forced to adopt the historical Dyle Plan (when not playing the what-if version of the campaign), which leaves the French with inadequate reserves behind the Ardennes and too many of their best forces committed to shielding Antwerp and Brussels. Because history tells us the headlong rush into Belgium was primary cause of the quick Allied defeat, an "If I Was in Charge..." version of the campaign is presented to allow both sides to explore some different initial deployments.
A simple set of campaign objectives are presented, with Victory Point awards centered on the following:
• The French must vigilantly protect Paris, which is the ultimate German objective. Two more cities along the map's south edge, Verdun and Metz, are also worth points (so the French cannot just abandon the Maginot Line).
• The possible surrender of Holland is triggered by German armor moving adjacent to any of the three Dutch major cities. Surrender chances are modified if the French and BEF are supporting Holland (which is why French 7th Army initially moved north of Antwerp).
• The possible surrender of Belgium and BEF Evacuation are triggered when the Germans drive a wedge between the Belgian coast and Paris. Surrender chances are modified, however, if the French and BEF are supporting Belgium (another nod toward the historical rationale of the Dyle Plan).
• The Germans also win points for battering the BEF, so the Allies are encouraged to keep this force intact.
The game's special rules are judiciously chosen to evoke the full flavor of the campaign. For instance, the Maginot Line is given its historical due, shown as a strong right shield that can unfortunately be outflanked through the Ardennes. Rules for special operations are something new to OCS, and these can capture enemy bridges and forts (but just on 10 May unless playing an optional rule). As mentioned above, the BEF can get isolated or mauled as part of the victory conditions, and if this happens a ragtag assemblage rides to the rescue: RN Destroyers, special Evacuation Ports, elite Irish and Welsh battalions, and even some Spitfires finally appear to provide some top-cover. Mix in the occasional Pause — an event that tugs sharply on the panzers' leash — and you've the kind of chrome that make The Blitzkrieg Legend a tremendous tool for historical study and an exciting source of gaming pleasure.
The Blitzkrieg Legend is also a game with tremendous replay value. Presented are 7 scenarios and 3 campaigns. The longest is just 13 turns; the largest fits on a standard 4' x 6' table. Series veterans know the depth of the model can lead to some long and complex turns, but here at last we have an entire campaign that can easily be played to the finish!
Scenarios
1. South. The first 4 turns on the southern half of Map B. Covers the fighting at Sedan as well as the crossings of the Meuse further downstream by 6th and 8th Panzer.
2. Center. The first 4 turns on the northern half of Map B. Covers the fighting at Gembloux Gap as well as the crossings of the Meuse by 5th and 7th Panzer.
3. North. The first 4 turns on Map C. Covers the air landings and surrender of Holland.
4. Mini-Campaign. Links the first three scenarios into a short campaign using two maps.
5. Sedan. Lasts just 2 turns and uses just a small portion of Map B. Covers the French counterattack and German breakout.
6. Arras. Lasts just 1 player turn. A teaching scenario covering the Allied counterattack.
7. Dynamo. Lasts 8 turns. Plays like a campaign game, using just Map A to cover the important events during the last half of the campaign.
Campaigns
1. "No Holland" Version. Doesn't include the fighting in Holland, which is "automatic" and not under player control. Uses two maps, the full 13 turns.
2. "With Holland" Version. Uses all three maps, the full 13 turns.
3. "If I Was in Charge..." Several variations on either of the two campaigns are offered.
Components:
- OCS Series Rulebook
- TBL Game Specific Rulebook
- Two Charts and Tables Booklets
- Full Color Game Map (two 22x34, one 28x15)
- 1,960 Counters
- One 8.5x11 Play Aid
- 10 Scenarios (3 of them are Campaign Scenarios)
- Box and Dice
No comments:
Post a Comment